Category: Working in Legalboards

  • Anatomy of a Card

    Anatomy of a Card

    In this guide, we’ll walk you through the anatomy of a card within Legalboards. We’ve heard from our users that knowing every aspect of the card’s features can be overwhelming, and we’re here to help with that! Before we get started, let’s go over the basics of a Kanban board and why they can be beneficial to lawyers. 

    Please note, if you’re a visual learner, there is a video summary at the end of this guide.

    What’s a Kanban Board?

    In our Anatomy of a Board guide, we walk you through both the basics of a Kanban board and boards within Legalboards. You can read more about that here.

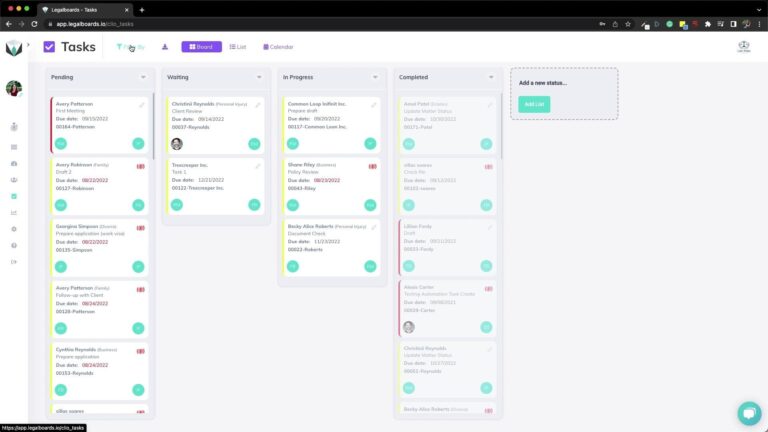
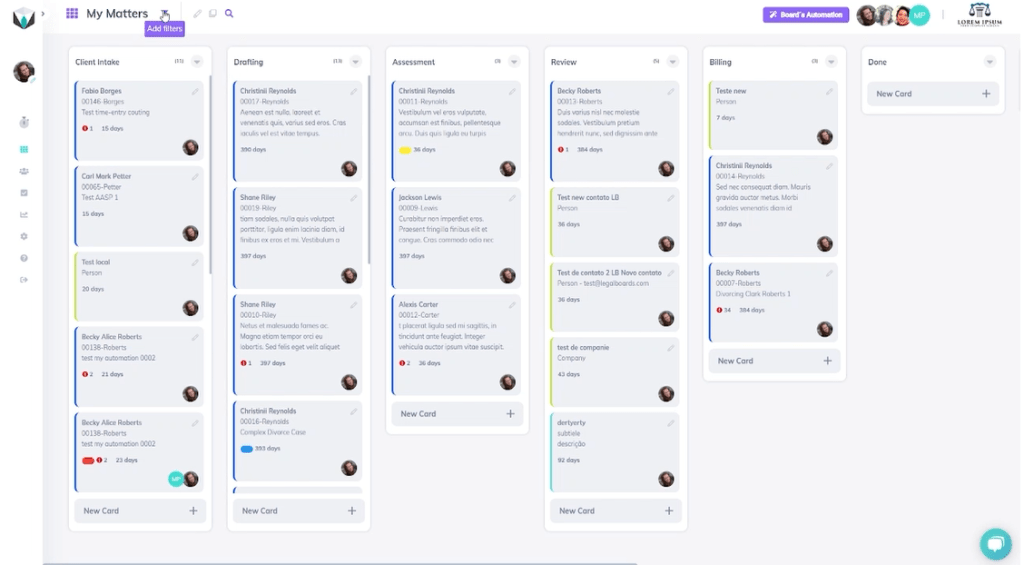
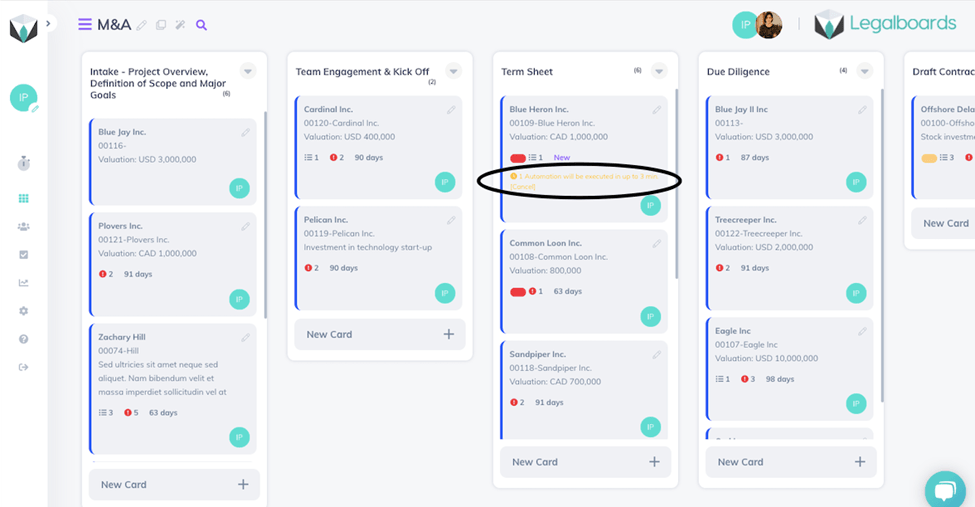
    To give you a basic understanding of a Kanban board, it’s important to understand that Kanban boards can be extremely simple. At their most basic stage, they can reflect on the progress of a project in terms of what needs to be done, what’s currently being worked on, and what has been completed.

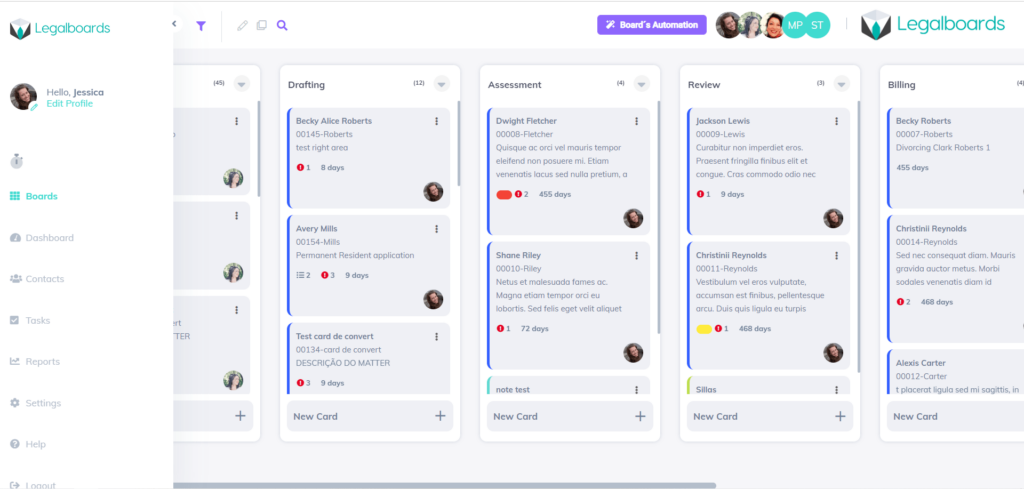
    As such, the columns on a board are usually the phase/stage of the work and cards are the task, matter, etc., that fits into that phase. 

    The Basics of a Card

    If a card reflects the work that needs to be done, for legal teams, cards can reflect matters with sub-tasks within that matter. In Legalboards, cards can hold a lot of important information and we’ll talk a bit about that now.

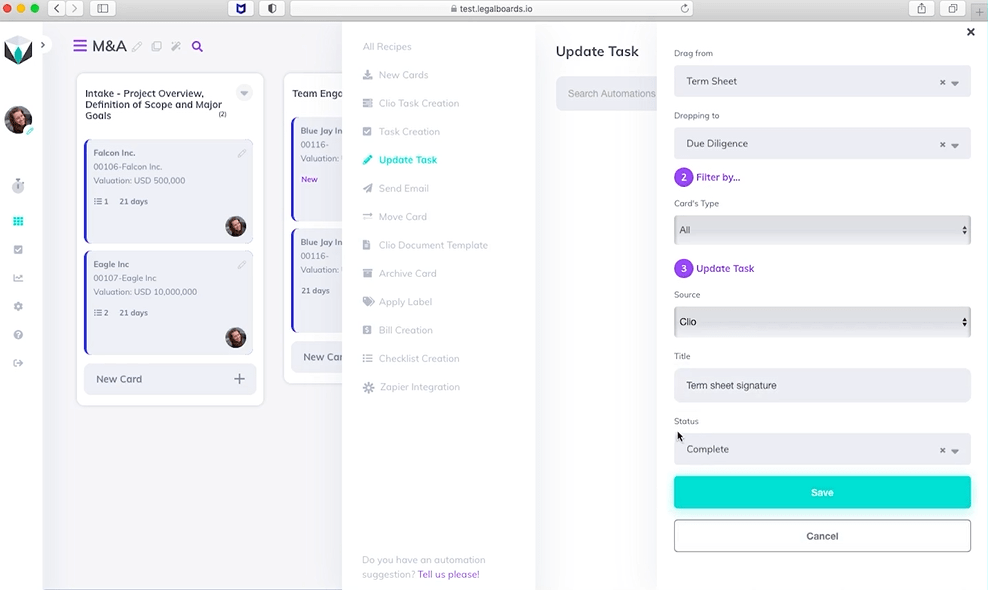
    There are three types of cards- contacts, notes, and matters. Contacts and note cards are helpful for organizing specifics of your workflow. For example, note cards can be used to denote important information to your team. By pinning note cards within a column, you can easily communicate considerations for that specific phase. Matter cards are the most common type, and what we will primarily focus on within this guide.

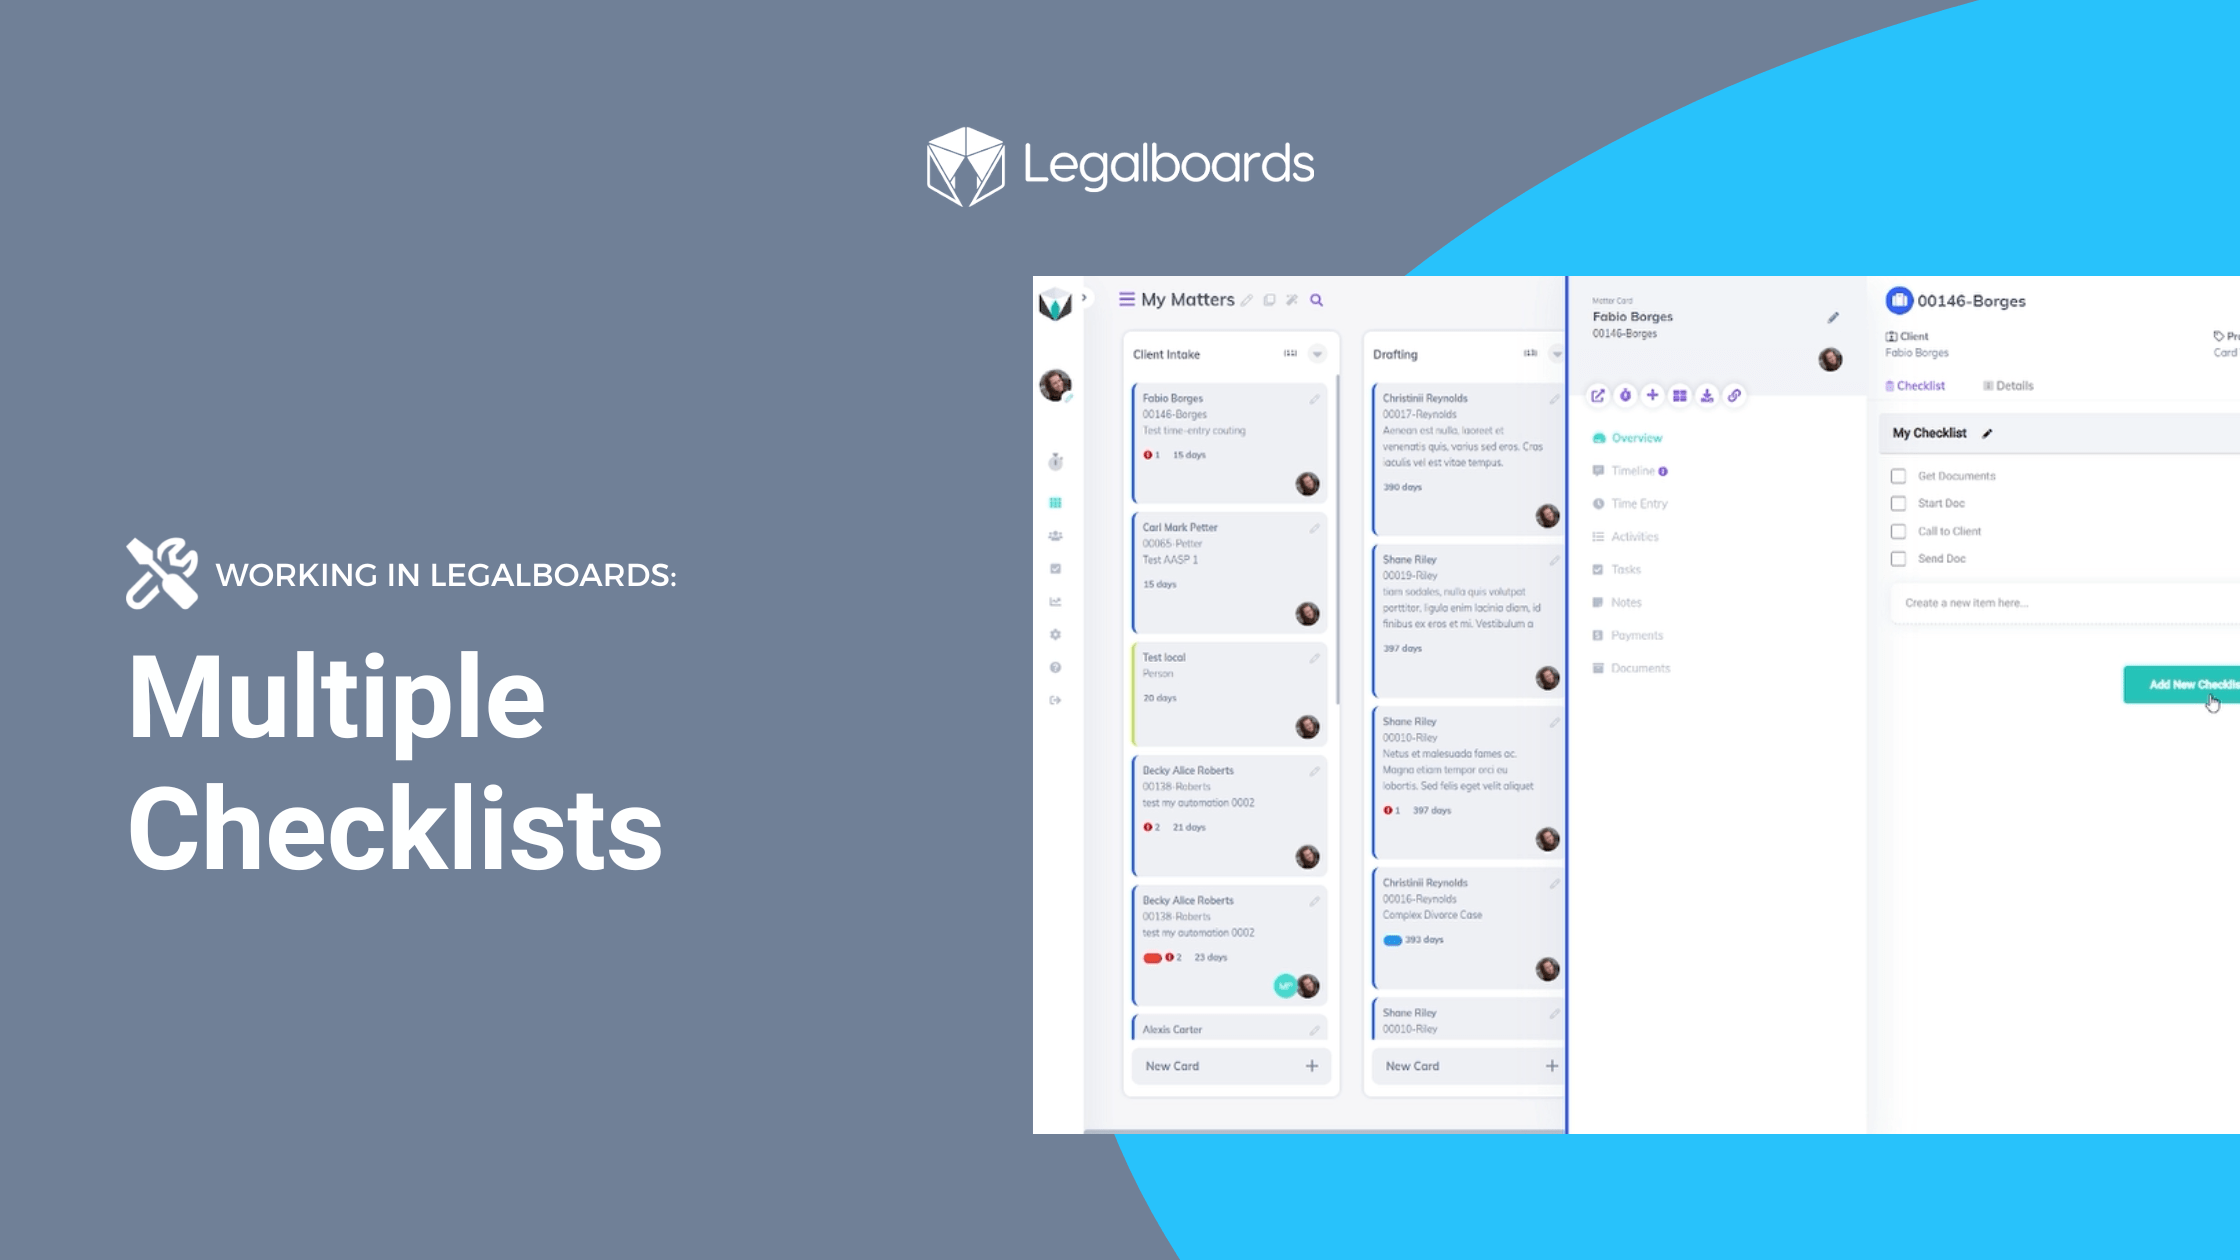
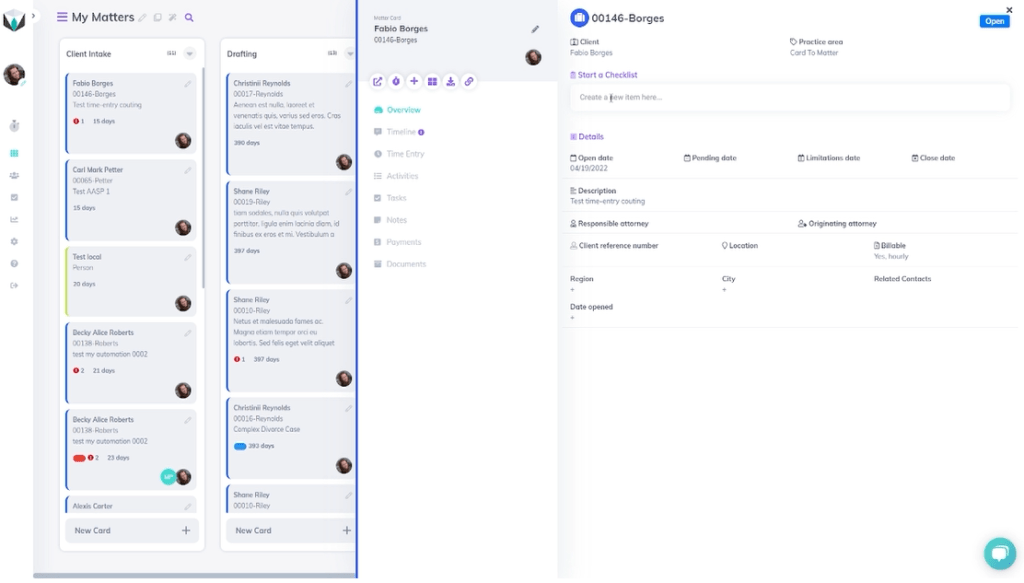
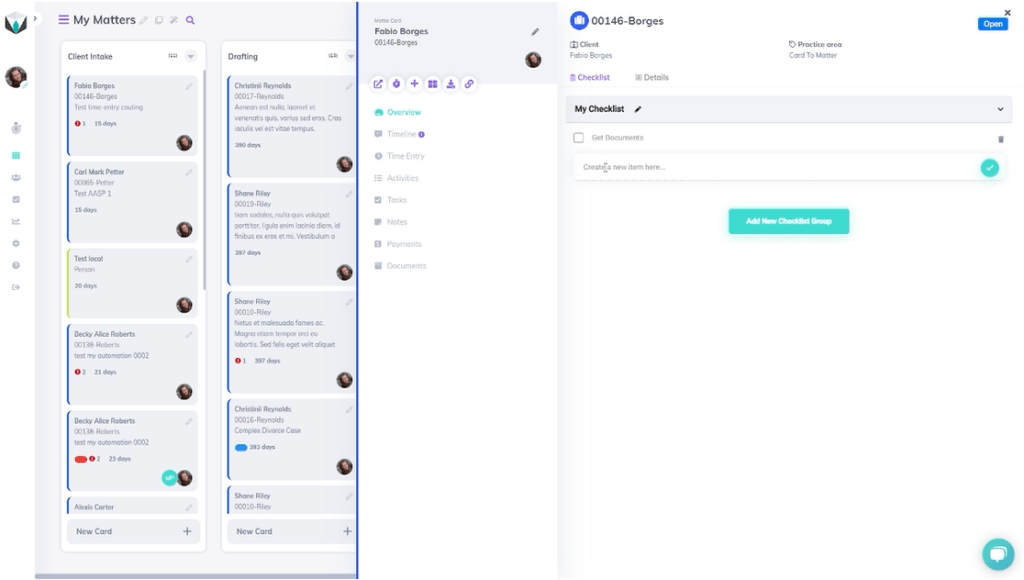
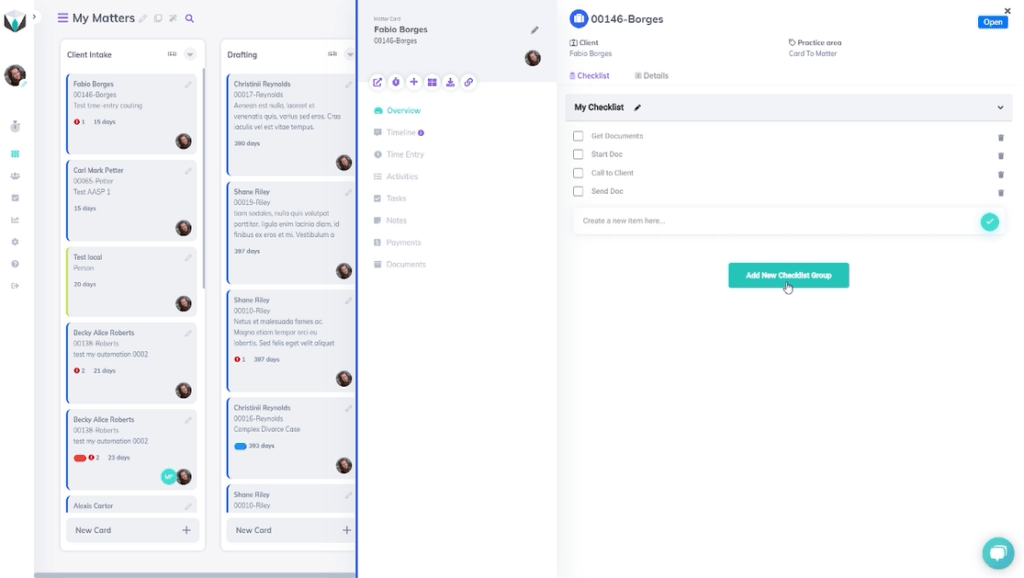
    Whenever you open a card, you’ll see one of two things. If you have a checklist attached to the card, you’ll see that, but if you do not, you’ll see the details of the card. You can see this in the image below. It’s also important to note here that checklists are only for within Legalboards, it will not be shown in your case management software.

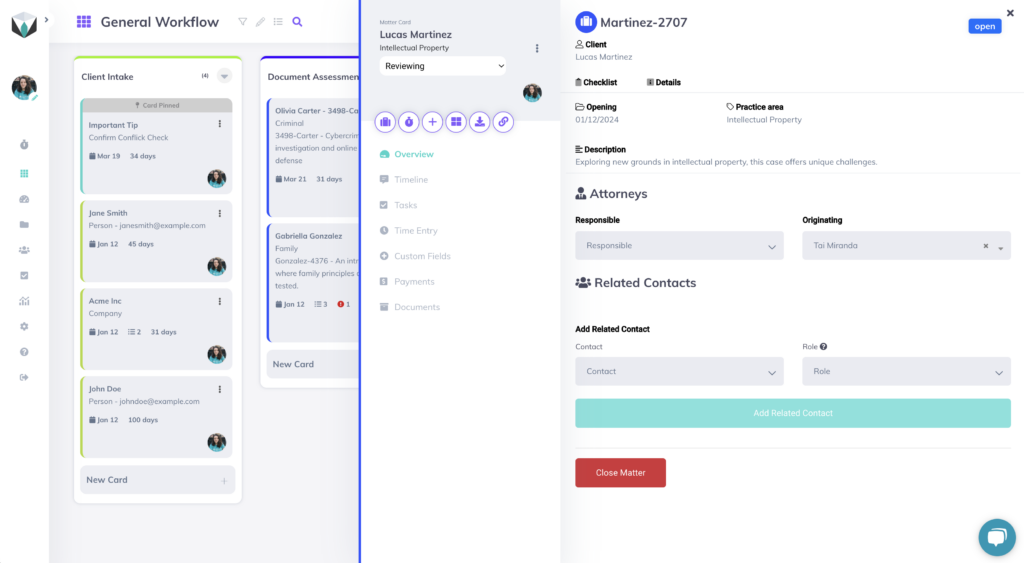
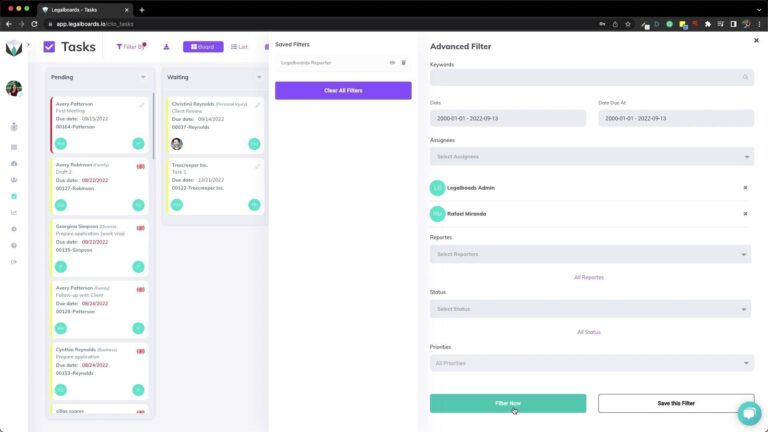
    In the details, you’ll see everything about your card. This includes:

    • Client name and contact information
    • Practice area
    • Key dates: open, pending, limitation, and closing dates
    • Description
    • Responsible Attorney
    • Originating Attorney
    • Related contacts
    • And Any custom information you want

    There is also the option to show/hide unanswered fields so you can see only what is appropriate for this card.

    Card Menu

    To the left of any card is a menu that helps organize different aspects of a card. Here, you’ll see the name and number of the matter (based on your integration data) and what column the card is in. Next, you’ll see the label attached (denoted by the color) and a few buttons.

    The first button is how to open your integrated case management, in our example is Clio, “start a timer”, new task, task board, export card, and copy card link. You’ll also see the “Edit Matter” button or the link for the integrated tool to open the same matter.

    From there, the tabs give you options. The overview tab is to see the card details and checklist. The timeline tab lets you view the activity of this card- it will break down movements, automations, and detail changes. You can also filter the timeline by activity.

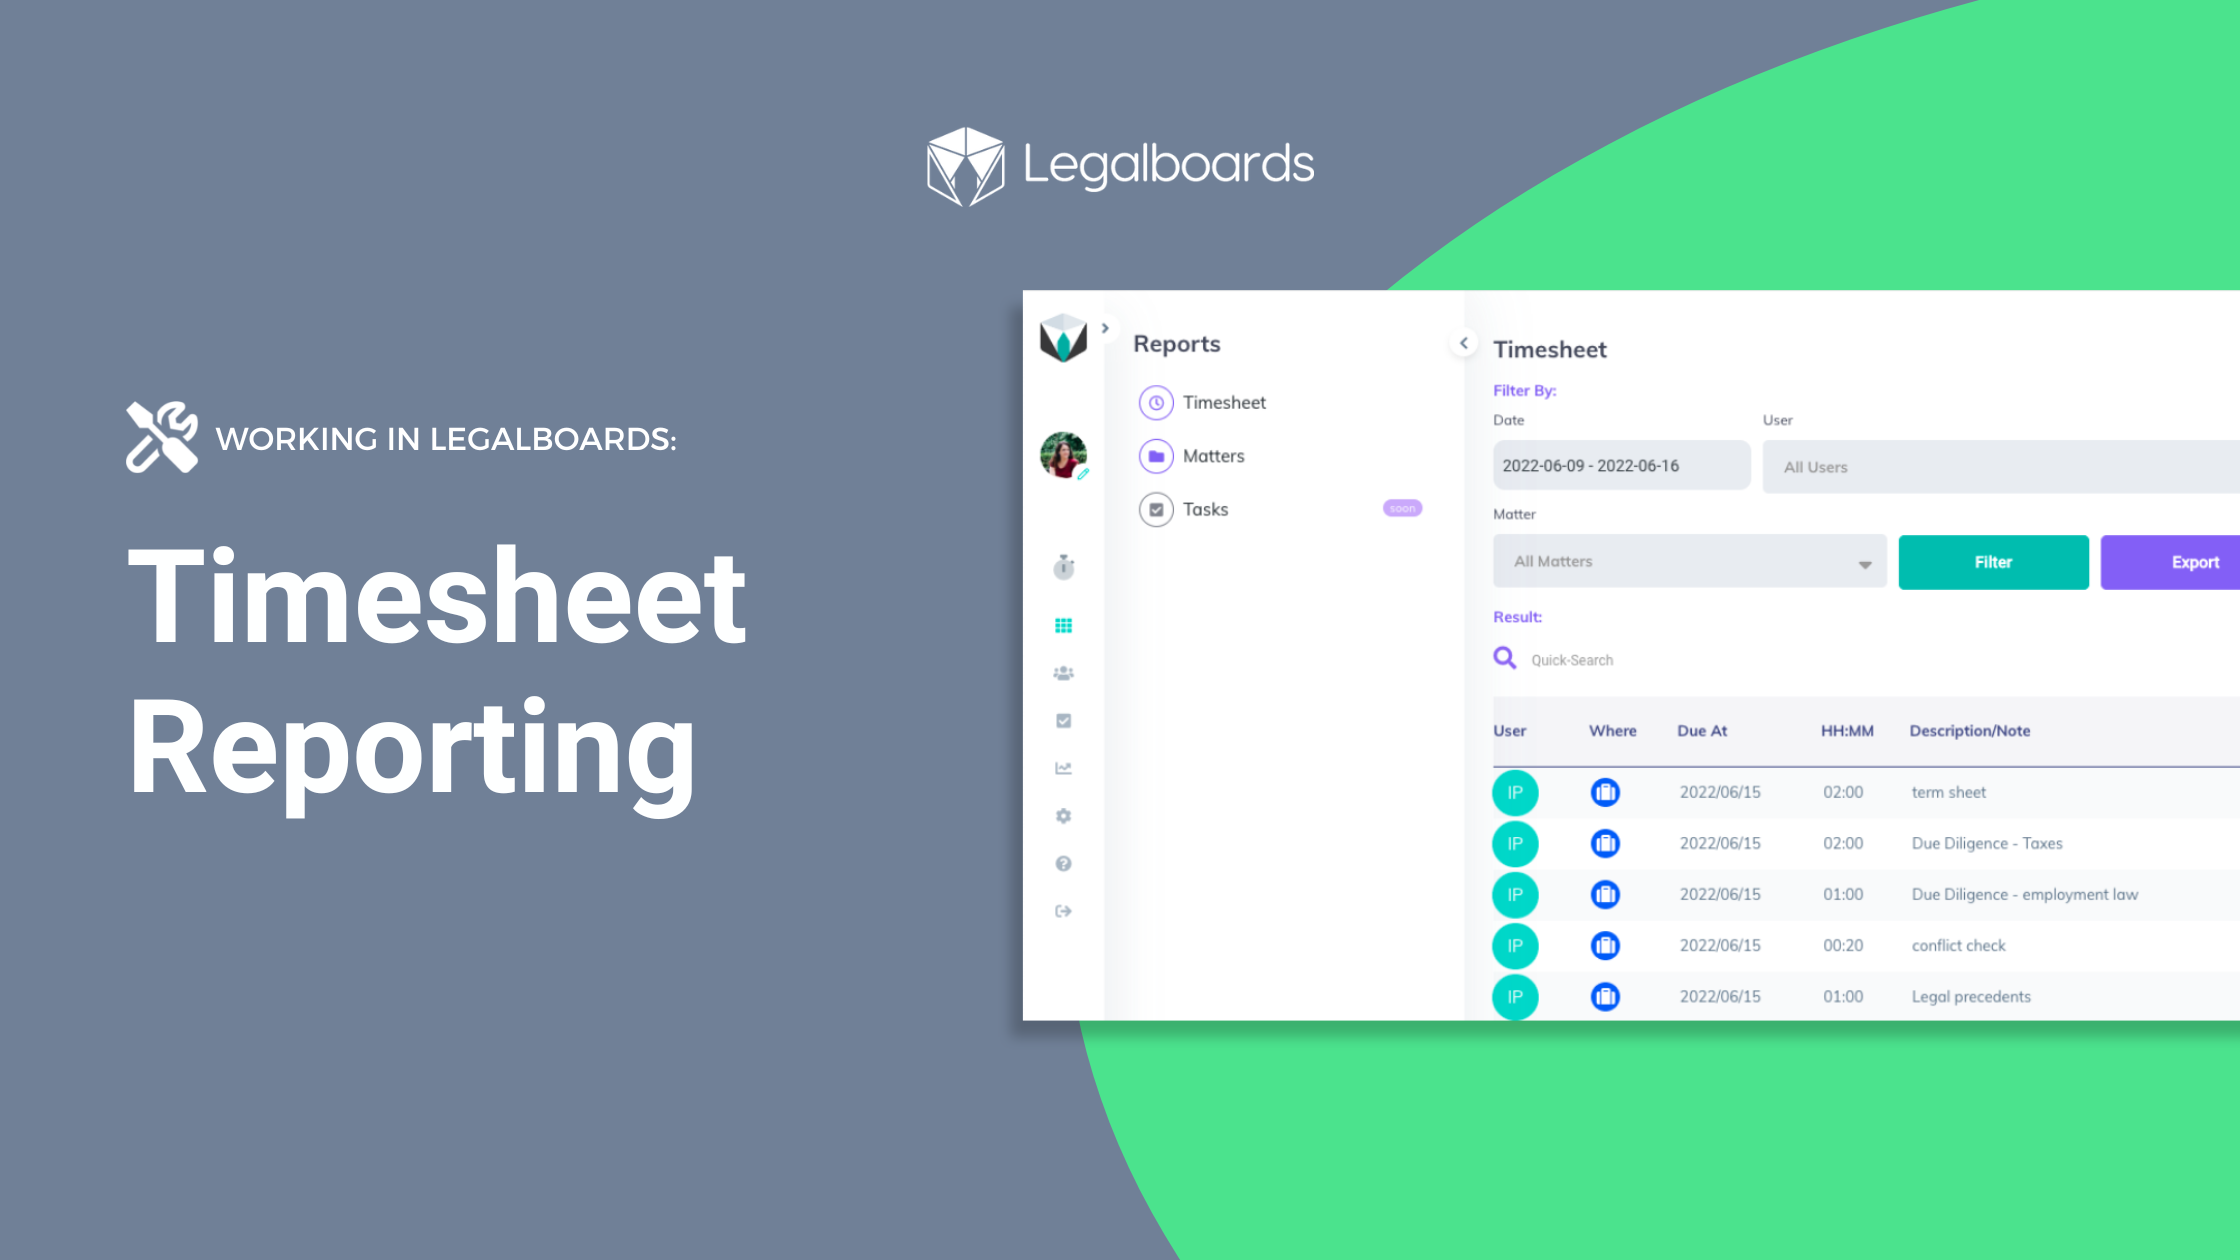
    Next, we have time entry. This is where you can start a time entry and keep track of those entries as related to this specific card. Then you have activities.

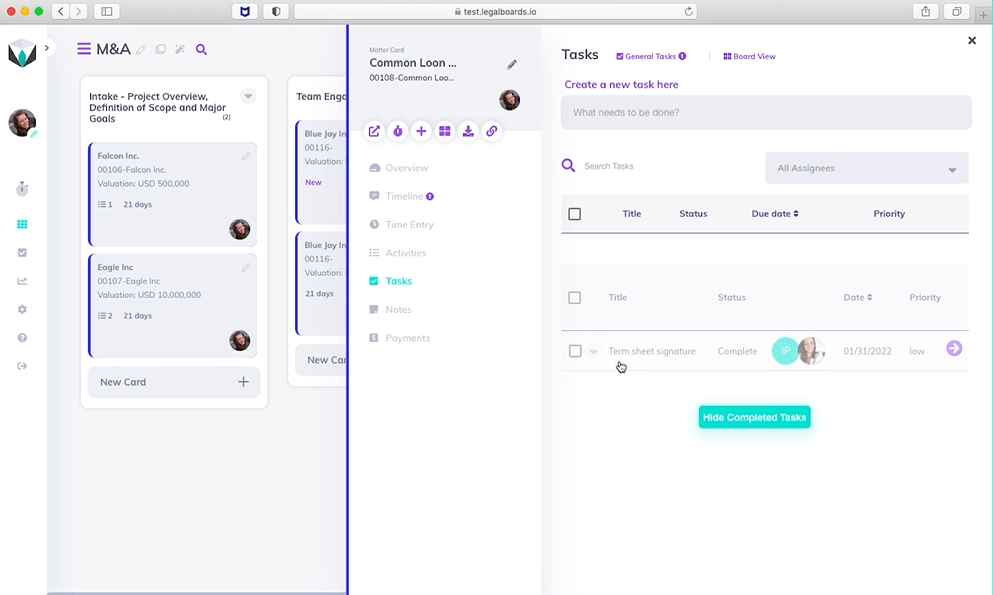
    Next is tasks. This is where you can see the work that needs to be done for this matter and their due dates. You can also see the list of completed tasks by hitting the show completed tasks button. You can also click on the task directly to see more information about it. When clicked, the task will show the assignee, reporter, date, description, checklist, and work logs (time entries).

    Depending on your integrations, there are also notes, communications, payments, documents, and Docuplayer. Each of those gives you more information about an aspect of a matter. For example, LawPay integration users will see information about their billing and invoicing in the payments tab.

    Board View: Card Navigation

    An easy option to view more information and edit cards is directly within your board view. When looking at your board, you can click on the three dots on the right side of a card to quickly make changes.

    By clicking on the three dots, 6 options will appear. You can edit the card or the members, archive or delete the card, pin the card to the top, or duplicate the card.

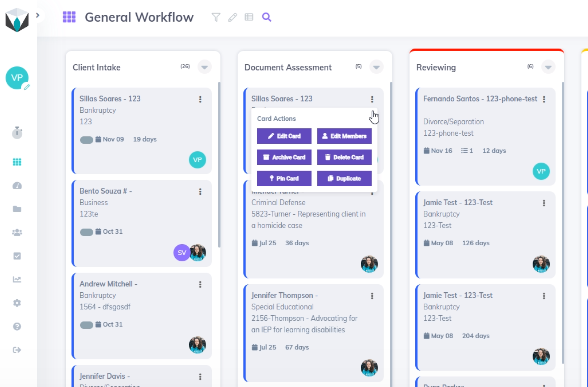
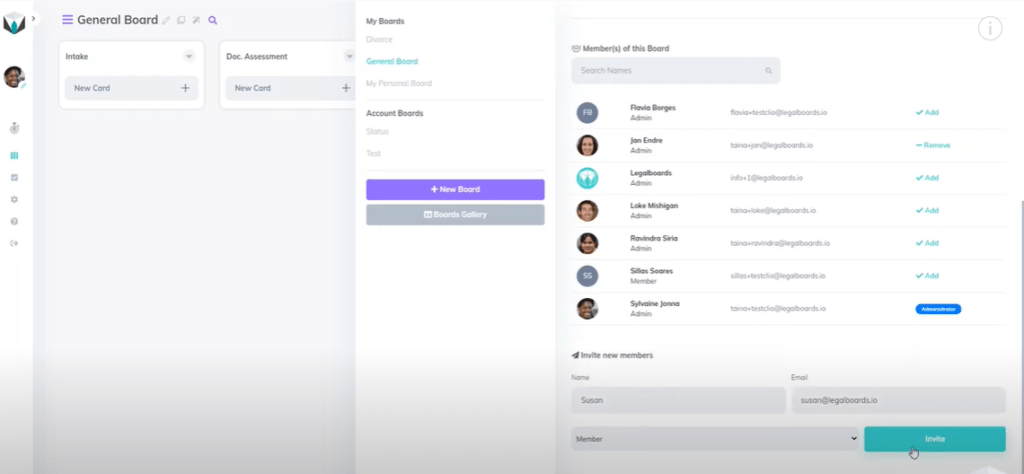
    If you click “edit card”, you can edit the title, subtitle, and apply a label. Labels help designate the current status of the card. If you click on “edit members” you can directly edit the card members. If you need more help with managing board members, please refer to this guide. When you add new members, you’ll see both of their tiles on the card.

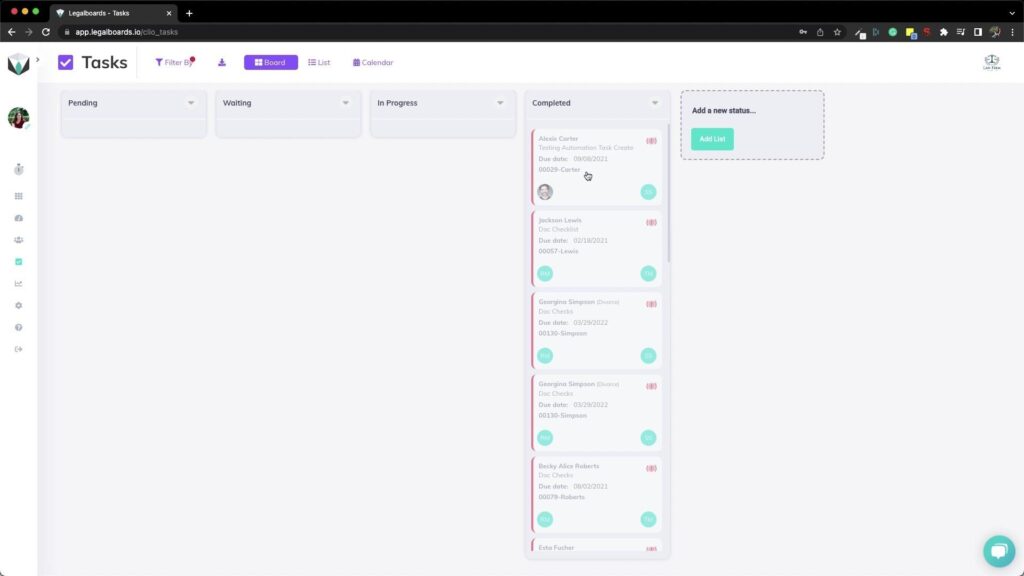
    Archiving a card means the card will be greyed out and added to the archived card column. Deleting a card however, means it is no longer viewable.

    Summary

    Check out this video summary of this content (with some more detailed examples) below. 

    If you have any questions, please feel free to contact us at support@legalboards.com, use the chatbot in your account, or take out a support ticket here. If you have any questions about how boards work, check out our guide here, which should help you grasp more about organizing and managing your boards.

  • Working in Legalboards: Event Automation

    Working in Legalboards: Event Automation

    Some events are bound to happen- especially as your cases progress. That’s why we’ve added the new event automation that works directly within Clio for automated events on your calendar.

    In this guide, we’ll go over how to use the new automation within Legalboards. If you’re more of a visual learner, check out the video below to see how the new event automation works. 

    Please also note, this automation is only available for users that have integrated their Clio accounts. Visit our support portal for information about how to integrate.

    Getting Started

    Like our other automations, creating this follows the same steps of selecting some parameters and a trigger. To learn more about automation in Legalboards, check out this article.

    To view the automations on a board, simply click the “My Automation” button. Here, we can see all of the automations for the current board we’re using organized by the board’s columns. In the case that your board has multiple automations, you can also filter these by the action, trigger, or keyword.

    Creating The Automation

    To create a new automation, we’ll click the “New Automation” button, as shown below.

    Event automation screenshot 1

    From here, the sub-menu will appear with options to create a new automation. Now we’re going to select “Create Event”. We can select one of the three triggers (card movement, time, and Clio task update). For this example, let’s focus on using the card movement trigger. Using either of the other two triggers can help create automated events based on completing a task or a follow-up based on elapsed time.

    We’ll select “Card Movement” as our trigger and specify movement from the “Waiting Forms” column to the “Assessment” columns for when we want to set up a call between the firm and clients. Then we’ll keep the filter to be for all cards.

    Event automation screenshot 2

    Specifying Details About Your Event

    We’ll need to specify some information about the event that we want to be automatically created based on the card’s movement. Calendar automation can be especially helpful when we want to set up an event based on case progression.

    In this example, we want to create an event 2 days after the card has been moved. To do this, we’ll need to specify whose calendar this event is going to be created for, our period between the task being updated and the event creation, and the timing and summary, description, and attendees of the event.

    For the attendees, we have a selection of options, and you can choose more than one. For this example, we’ll choose “Related Contact”, “Matter’s Responsible Attorney”, and “Client’s Email” as the parties we would like to attend this event, as shown below.

    event automation screenshot 3

    Once we’ve filled out all of the fields, we can save this automation and start benefitting from using it. Automated events are helpful for meetings we know need to happen after certain triggers and can be attended by both internal and external parties.

    Need Some More Help?

    Didn’t find what you were looking for? Check out our support portal, and YouTube channel, or contact us for more help.

  • Working in Legalboards: Clio Embed

    Working in Legalboards: Clio Embed

    As announced at Clio Con 2022, Legalboards is one of the first embedded apps within the Clio interface. This guide is to help users make the most of this integration and to help with some of the issues that have arisen for users since the launch of this feature.

    Check out the video below to see how the embedded integration works and read on for the benefits of using this feature and how to solve common issues.

    Why Use This Feature?

    Simply put, the three main benefits of using this feature are:

    1. Customization to your workflow so you can provide more detail;
    2. Organizing your tasks with Kanban; and
    3. Automating your tasks so you can save time.

    Customize Your Work

    We know that tasks can be more than just labeled “outstanding” or “completed”. With Legalboards, you can create custom task statuses (read more here). By using the Legalboards tab in Clio, now you can create and use these statuses directly within Clio. 

    Kanban As A Visual Tool

    It’s pretty well-known how much we love Kanban boards as a visual tool. They’re a great way to see an overview of your workflow at a glance.

    Traditionally, your tasks in Clio have looked like this:

    By using the Legalboards tab within Clio, you can now see exactly how your tasks are progressing. As you can see below, how your boards appear in Legalboards is now viewable in Clio.

    Use Automation To Save Time

    Reduce the time you spend on repetitive tasks with the Legalboards automation capabilities. With us, you can automate email communication with both internal and external contacts. Both clients and team members can stay updated on the progression of tasks/matters.

    With automation, it’s also possible to work more efficiently through the creation of task chains. To learn more about task-chain automation, check out our blog post.

    Important Things to Note

    To get the most out of this feature, it’s important to note the following;

    • Automations (and custom statuses) need to be made in Legalboards first. This is so they can then be shown in Clio once saved.
    • To see more information about a task, click on the task directly. Then you can see the assignee, reporter, status, date, and time entries associated with the task.
    • Data is automatically synchronized between Clio and Legalboards, so you don’t need to input information twice.

    Common Issues and Questions

    Since launching this feature, we’ve heard from users about common issues or questions about this feature. 

    1. Recently Created or Changed Statuses

    If you’ve recently created or changed one of the statuses in Legalboards, you may need to refresh your page in Clio to see that new column reflected in the interface.

    2. Task Creation Visibility

    Some users have reported that they’ve created a task in Clio and when they immediately enter the “Legalboards” tab, it may not be visible. This happens because both platforms may need a moment to sync the information between the two. For now, this is just a matter of time for the task to be created in Clio and Legalboards and then be visible.

    Still Need Some Help?

    Didn’t find what you were looking for? Check out our support portalYouTube channel, or contact us for more help.

  • Advanced Task Filters

    Advanced Task Filters

    In this short guide, we’ll walk you through how to use advanced task filters. Filters can help you easily find valuable information, and the advanced filters on your task board will help you navigate your current tasks.

    You’re likely familiar with how useful they can be in other programs to search for information that’s relevant to your current task or for your case. Let’s start with a quick refresher on how to set up a filter.

    Setting Up Filters in Legalboards

    Creating filters is easy, just follow these steps:

    1. Click the “Add Filters” button at the top of your board
    2. Select what information you want to set up a filter- for example, it can be by keyword, assignee, reporter, label, etc.
    3. Select the “Save This Filter” button to save your selections.

    If you need more help on how to create a filter within a board- check out this guide all about creating board filters.

    Advanced Filters In The Task Board

    Now that we’re familiar with how to set up a filter in Legalboards, let’s look at the advanced task filters that you can use with your task board. If you’re more of a visual learner, check out the video below.

    First, let’s go to your task board. Here you can see all of your tasks sorted by their status. To filter this board, we’re going to click on the “Filter By” button at the top of the board, as shown below.

    Advanced filters on task board screenshot 1

    When we click on this button, a sub-menu will appear that allows us to set up a filter, similar to the other board filters. For the task board however, we have some more options for filtering like dates, status, and priority.

    For this example, we want to filter by any date but with specific assignees. We’re going to select two assignees (Legalboards Admin and Rafael Miranda) and select the “Filter Now” button.

    Please note, the speed results appear may vary by the amount of cards the system has to filter through.

    Advanced filters on the task board screenshot 2

    In our example, we’ve filtered by these basic parameters around who is the assignee of these tasks. But, say we really want to focus on the high-priority tasks from these assignees so we can see the status of these tasks.

    We can do this by clicking the “Filter By” button again to re-open the sub-menu. From here, we’re going to select “High” in the drop-down menu for the Priorities field and then click “Filter Now”.

    Saving The Filter

    Similar to saving a board filter, we can easily save this new filter of specific assignees and high priority by entering back into the menu through the “Filter By” button. From here, simply click the “Save This Filter” button and name the filter to save it for future use.

    Advanced task board filters screenshot 3

    To clear the filters you have, simply click the “Clear All Filters” button.

    Need More Help?

    Didn’t find what you were looking for? Check out our support portalYouTube channel, or contact us for more help!

  • Dashboard Feature

    Dashboard Feature

    We’re excited to announce our new dashboard feature for our Standard and Advanced plans. It’s often easier to understand data when it’s presented in a visual way, especially when it’s a summary of what you need to know.

    With our new dashboard feature, you’ll be able to see at a glance how you and your team are working, what needs to be done/is outstanding, and keep track of your tasks.

    Let’s take a tour of the dashboard within Legalboards.

    Getting Started

    Accessing The Dashboard

    You can access the dashboard by clicking on the third icon on the side-bar to the left of your screen, as pictured below.

    From there, you can click on the dashboard to find this screen (below).

    With this, you can easily see key information about your day. Let’s go over what each of these things tell you on the left of the screen.

    • New Cards Today: This number shows you all of the new cards that have been created today. It also breaks down this number by the type of card (matter, contact, or note).
    • Tasks Created: This tells you the number of the tasks created today.
    • Tasks Due Today: This shows you the amount of tasks that are due today so you can easily understand what need to be done on a daily basis.
    • Tasks Overdue: This number is all of the tasks that are not yet completed.
    • Time-entry Today: This shows all of the time-entries registered today through our time-tracking feature.
    • Matter Updated Today: This shows you the amount of matters that moved columns today.

    On the right of this screen, this is a bar graph that helps you see the outstanding tasks by assignee. This can help you identify which of team members need a bit more help getting things done, or who should be the next assignee for a task.

    Board and Task Overviews

    When you scroll further, you’ll see the overviews of the boards and tasks, and some filters.

    Let’s start with the filters. Here you can see these items in 7 day period, 15 day period, or 30 day period. You can also filter by the boards in your account.

    On the left, you’ll see the overview of your boards. You can see:

    • New Cards Created: This shows you the total of new cards created in your time period (i.e. 7, 15, or 30 days). This is also broken down by the type of card (matter, contact, or note).
    • Archived Cards: This shows you the amount of archived cards in your selected time period.
    • Cards Moved: Here you can see how many cards changed columns in your selected time period.

    On the right, you’ll see the overview of your tasks. You can see:

    • Total Tasks Created: Which shows you the total tasks that were created in your selected time period.
    • Total Tasks Overdue: This shows you the total tasks that were created but not completed in your selected time period.
    • Total Tasks Completed: This shows you how many tasks were completed in your selected time period.

    More Charts

    If you keep scrolling, you’ll see more charts that help you understand how your team is working. In the dashboard feature, we wanted to include things that would give you insights about your workflows.

    In this section, you can see the following charts:

    Cards by Board: Where you can see how your cards are distributed by board.
    Hours Spent by Assignee: This shows the total of time entries registered during the selected time period.
    Cards Moved per Day: Here you can see all the cards that moved per type (matter, contact, or note) per day for each day of the selected time period.
    Matter by Attorney: This shows you all new matter created by attorney in the selected time period.

    • Tasks: Overdue vs. Done: Here you can see the ratio of completed to overdue tasks in your selected time period.
    • Tasks by Member: This shows you the distribution of tasks that were created in the time period by assignee and reporter.
    • Matter by Practice Area: This shows you the matters that were created in the selected time period sorted by their practice area.
    • Tasks by Status: Here you can see your tasks sorted by their last status update in your account for the time period.

    Still Need Some Help?

    Didn’t find what you were looking for? Check out our support portalYouTube channel, or contact us for more help.

  • Multiple Checklists

    Multiple Checklists

    Having multiple checklists within the same card in Legalboards can be super helpful. With the ability to create multiple checklists, you can improve the organization of your workflow by enhancing your cards.

    In this guide, we’ll walk you through how to create multiple checklists within the same card in Legalboards.

    How to Create Checklists

    Let’s start by clicking on a card within our board. From the sub-menu, we’re going to focus on the “Start a Checklist” field. In our example, we’re going to add the item “Get Documents” here.

    Once we’ve added that item to the checklist, it will appear under a sub-menu called “My Checklist”, as seen below.

    From here, we can add more items to the checklist for this card. For our example, we’re going to add three more items on our checklist (“Start Doc”, “Call to Client”, and “Send Doc”) that are relevant to the card. Once we’ve added these tasks, we have now created one checklist.

    To create another, we’ll click on the “Add New Checklist Group” and give it a name. For this example, we’ll name the new checklist “Accounting” and click on the name to be able to add new items to this new checklist within the card.

    For this specific list, we’re focused on billing activities. So, we’ll add the items “Start Bill”, “Approve Bill”, and “Contact Client” to the checklist (shown below). A reminder, by clicking the checklist name, the items will be shown.

    Completed Items and Changing Names

    Completed Items

    The goal of creating a checklist is to break up a larger task into smaller and easily completed steps (find more about the difference in our resource). So, let’s go over what happens when you complete an item on a checklist.

    When we’ve completed an item, we can click on the name of the checklist that it’s associated with. In our example, we want to update the checklist to reflect the completion of one of the tasks on the “My Checklist” checklist.

    By clicking the box next to an item, it’s then marked as completed. To see these items, we can click the purple text (“View Completed Checklist”) next to the checklist name.

    Changing The Name of a Checklist

    In our example, we also want to change the name of the “My Checklist” checklist to “General Checklist”. We can change the name by clicking the “Edit” button next to the checklist name, where our screen will look like the one below.

    To change the name, we’ll update it to be “General Checklist” and select the save button to save the changes.

    Still, Need Help?

    Didn’t find what you needed? Check out more videos, visit our support portal for more help, or contact our support team.

  • Board Filters

    Board Filters

    We’ve introduced a new feature that helps you easily find exactly what you need in no time. With the new board filters, you can filter your board by multiple parameters and save those selections to use again anytime.

    In this guide, we’ll walk you through how to get started with creating board filters to easily see the information you need.

    How to Set Up Board Filters

    Step 1: Set Up a Filter

    To get started setting up filters for the board, we’re going to find the “Add Filters” icon (as shown below).

    When we click on that icon, we can set up an advanced filter from the sub-menu. To make an advanced filter, we can filter by active cards, keywords, assignees, and labels, as seen below.

    In our example, we’re going to select active cards, include the keyword “test”, a specific assignee, and select the “Important” label. Once we’ve inputted the desired information, we’ll select the “Filter Now” button to see our selections. Depending on the amount of cards on your board, it may take a second to properly filter through the cards.

    Step 2: Saving a Filter

    So, now we have the first filter results. Now we want to create another filter without the keyword information. To do this, we’ll click the same “Add Filters” icon. To create a filter without it, we’ll take out the keyword information and select the “Filter Now” button again.

    By excluding the keyword information, we can now see more cards on the board. Notice how in addition to the first assignee (Jessica Gonzalas), there is another important assignee. Let’s add that assignee to the filter as well and then save it.

    Again, we’ll open the filter sub-menu through the “Add Filters” icon. Then, we’ll add this second assignee (Mike Patton) and select the “Save this Filter” button to save our selections.

    Now, a pop-up will come up asking for a name for the filter. For us, we will name the filter “Mike Patton Filter” and save it. From there, a new saved filter will appear to reflect our newly saved filter. By selecting the eye icon we can toggle saved filters on a board.

    Filters can also be easily removed by selecting the “Clear All Filters” button. When that button is selected, we can return to seeing all of the available cards.

    Still Need Help?

    If you want to start using more automations in your workflows, check out our other video guides on our YouTube channel.

    Didn’t find what you needed? Check out our support portalcontact our team, or check out our other resources for help using Legalboards.

  • Managing Board Members

    Managing Board Members

    At Legalboards, we want to help you and your team collaborate more effectively. One of the ways to improve how your team works is adding board members to your Legalboards account. These members can be view-only or have the ability to make changes, so you can work effectively, so managing board members is easier than ever.

    In this guide, we’ll walk you through how to manage board members within your Legalboards account. If you’re more of a visual learner, check out the video guide below or on our YouTube channel.

    Managing Board Members

    Editing Board Members

    Managing board members in Legalboards is easy. The first step is to go to a board and click on the pencil icon (“Edit this board”) next to the board’s name.

    From here, we can add, edit, or invite new members to the board we select, as seen below.

    We can easily add or remove members by clicking the “Add” button next to a name. When members are added, this icon will change to “Remove”, which allows you to remove them from the board. Also remember that you can edit members at any time!

    Inviting New Members

    If we want to invite new members, we’re going to scroll down within the menu to the heading “Invite New Members”. To invite a new member, we just need to provide their name and email and then select what kind of permission they will have.

    Types of Permissions:

    • Admin: Admin permission allows a member to manage all features. These members can use boards that are shared with them and create their own.
    • Viewer: Viewers can only access the boards that are shared with them but do not have permission to make changes.

    Once we’ve selected a permission type, we’ll click on the “Invite” button to invite that person to the board, as seen below.

    Once that invite has been sent, the person will appear under the “Invite New Members” heading similar to the “Member(s) of This Board” heading. If you want to change this, you can also hit the remove button.

    Need Some More Help?

    Didn’t find what you needed? Learn more about other features in Legalboards by checking out more videos or visit our support portal for more help.

  • Avoiding Duplicate Tasks

    Avoiding Duplicate Tasks

    A common issue we’ve heard from users is about duplicate tasks being created within a board. But, how can you effectively avoid duplicate tasks?

    There are many strategies, but today we’ll focus on combating one of the underlying problems- abnormal card movements. By knowing how to deal with moving a card backwards, we can avoid duplicate tasks.

    Abnormal Card Movements

    When we use a Kanban board, each column in our workflow represents a phase in our process. We expect the cards to be moving from left to right until the reach the last phase. However, sometimes it’s necessary to go back one step for a particular matter, therefore moving the cards from right to left.

    Sometimes, duplicate tasks can be created from moving a card backwards. If, for any reason, you identify that a matter is in the wrong column and you want to move it to a previous column (to the left), it’s important to keep in mind how this may trigger an automation.

    In our example, we’ve identified a matter you want to move. We want to move a matter from “Due Diligence” to “Term Sheet”. By doing this however, we will trigger the automation to create the task “Draft Term Sheet”.

    If you don’t want this duplicate task to be created, click on the yellow message on the card (as seen below).

    When you click on this yellow warning text, a pop-up will appear that allows you to cancel the automation (below).

    By doing this, no duplicate task has been created and we have successfully avoided any duplicate tasks that may arise with a backwards card movement.

    Still Need Some Help?

    Didn’t find what you needed? Learn more about automations in Legalboards here, check out more videos, or visit our support portal for more help.

  • Automation Action: Update Task

    Automation Action: Update Task

    We’ve heard your requests and have added a new automation that allows you to update the status of your tasks based on the trigger you choose. By using this new automation, you can reduce your backlog of work by automatically updating your task’s statuses.

    If you’re more of a visual learner, check out the video walkthrough below.

    How To Set Up the Task Status Update Automation

    To get started, let’s select the board we want to use this automation in. We’ll then select the “Automations For This Board” option in the toolbar. From there, we’re going to select “Update Task” from the menu (see below). When we select “Update Task”, another screen will appear with a “New Automation” button.

    Click on the “New Automation” button to see the screen below. Now, we will select which of the triggers we want to use to set up the automation. If you’re unsure of which trigger to pick, you can learn more about automation triggers here.

    For this example, we’re going to use the “Card Movement” trigger. Once we’ve selected it, we can specify the “Drag From” and “Dropping To” fields. We’re going to choose the Term Sheet option for “Drag from” and the Due Diligence option for “Dropping To”. Once we’ve specified those we have the option of also picking a filter. For this example, we’ll leave this and move on to the third step.

    The third set of fields will be where we set the task status update. As shown below, we’re using Clio as our source, have given the task the title “term sheet signature” to the task, and have selected “complete” as the status update.

    Once we have specified those fields, we can click on the “Save” button to save our automation details. Now that we’ve set up that automation it will appear in the list of automations for the board and is ready to be used!

    Task Status Update Automation in Action

    Please note, when the card movement happens, a yellow warning will appear on the card that gives you the option of cancelling or keeping the automation. When the card is in it’s new column, we can now click on the card then on “Tasks” within the sub-menu and see the task as completed (as illustrated below).

    Examples of Use

    This automation prevents tasks from being left behind with the wrong status, which can be particularly helpful if someone forgot to update the status of their tasks. Here are some examples of how the automation could be implemented:

    • Trigger card movement: Whenever a matter moves from one column to the next in your workflow the system will automatically update the status of previous tasks to complete. In the example above, all matters arriving in the “Due Diligence” should have their term sheet signed already. Therefore, if someone forgot to mark this task as completed the system will automatically do that.
    • Trigger task update: You can set up this automation based on another task update. Often users have tasks (“task X”) that can only be completed if a certain task (“task Y”) was completed prior. If a user has completed both tasks on the same day or if someone completed task Y before and forgot to update the status, with this automation they will only have to update the status of one task and the other will be automatically updated.
    • Trigger time: If you have a task that is necessarily completed or no longer relevant, after a certain period of time you can set up an automation to update its status based on a time frame.

    Still Need Some Help?

    Didn’t find what you needed? Learn more about automation in Legalboards here, check out more videos, or visit our support portal for more help with creating automations.

  • Timesheet Reports

    Timesheet Reports

    A great way to track the progress of a workflow is to use reports to summarize information. In Legalboards, you can generate reports in three different ways- by tasks, matters, and now timesheets. Now, these reports can be generated using the time entries in your account.

    If you’re more of a visual learner, check out the video walkthrough of how to generate timesheet reports below.

    How to Generate Timesheet Reports

    Within Legalboards, we’re going to find the “Report” button on the left side of the screen. When we click on “Reports”, a sub-menu with three options will appear. Those three options are: timesheet, tasks, and matters. For this guide, we’ll focus on the timesheet option.

    Once we’ve clicked on the “Timesheet” option from the sub-menu, the report can be generated in different ways. Depending on what we want to capture within the report, there are a couple of options to choose from. We can filter the report by a date range, user(s) associated, or by matter.

    In this example, we’re going to first filter by the date range. With this, we’ll select a timeframe from November 1 to 13th, 2021 to first generate our report. And from there, we can further filter by selecting the user we want to focus on.

    If we wanted, we could also filter down one more level into specific matters. But, in this example, we’ll just stick to filtering by time and user in order to export our generated report.

    Next Steps

    Didn’t find what you needed? Check out our YouTube channel for more video guides, support portal, or contact our team for more help with Legalboards.

  • Checklists vs. Tasks

    Checklists vs. Tasks

    We know that checklists and tasks can be similar, especially depending on what needs to be done. Usually, checklists are comprised of a list of smaller tasks that need to be completed or reminders for upcoming tasks.

    “The Checklist Manifesto” by Atul Gawande helps to differentiate checklists and tasks by taking a look at how professionals would organize their workflows. The book primarily focuses on the medical field to explain how tasks have gotten more and more difficult.

    Complex tasks aren’t only present in a single industry. We know that for the legal industry, this is especially true. At Legalboards, we’ve developed a system to help keep track of matters by breaking them down (check out this article for more information about how to do this).

    What Is The Difference?

    So, what is the difference? Checklists hold the “less important” tasks and are more for reminders. That’s not to say that checklists can’t hold important tasks, but it is more about separating a specific task into smaller phases.

    Another key difference is that tasks have deadlines attached to them and a checklist usually does not have a timeline attached.

    For example, a very common task we all usually complete is grocery shopping. Where that is the task, the items you need to purchase would be the checklist.

    In this very simple example, a task is broken down into a series of things that need to be done in order to complete the task. But how does this translate into the legal industry?

    Let’s look at how this would work within the legal industry and what this looks like within Legalboards. Legalboards has tasks integrated with Clio but the checklist is not normally included while using Clio.

    Examples of Checklist vs. Tasks in Legal

    Say you need to draft an agreement for a client (the task). When you put this into Legalboards, this would look to be in any one of the phases (columns) in a workflow.

    But, drafting an agreement contains more than one task. It could include a meeting with the client, drafting the agreement itself, any required research like if a compliance clause is applicable to the draft or if there needs to be a mediation clause, etc.

    For this client’s matter, we would want to have a task named “draft agreement” with a checklist including these smaller tasks. The checklist would therefore include:

    • Check compliance clause; and
    • Check the mediation clause.

    Let’s look at another example. In the first phase of a workflow, the task “File a Motion” has been created by the responsible lawyer. The task needs to be completed in 3 days. At the same time and within that same workflow, a checklist will be automatically created with the items:

    • Check documents; and
    • Open a folder in Google Drive.

    Likely, a paralegal will need to check and complete these items. The items are important but they are less important than the overall task and they do not have a deadline.

    Creating Checklists and Tasks in Legalboards

    Now that we know the difference between checklists and tasks, we can fully understand just how beneficial they are when it comes to organizing and keeping track of workflows.

    If you want to learn how to start creating checklists and automations in Legalboards, check out this article, or if you’re more visual, this video tutorial.

    Didn’t find what you needed? Check out our support portalcontact our team, or check out our other resources for help using Legalboards.